Caring for our Canopy:
A Homeowner’s Guide to Street Trees
Trees are a valuable community investment, offering shade, clean air, and beauty. As a homeowner or property owner in Timnath, your role in the care and pruning of young trees is vital to their health and long-term growth. By nurturing these trees now, you’re helping create a thriving urban canopy that will benefit future generations.
Property Owner’s Responsibilities
- Property owners are responsible for maintaining the health of trees planted in the right-of-way adjacent to their property, including replacing any trees that have died with a Town-approved species. (See Planting a New Street Tree)
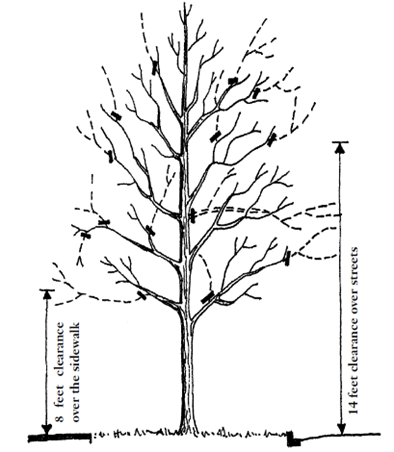
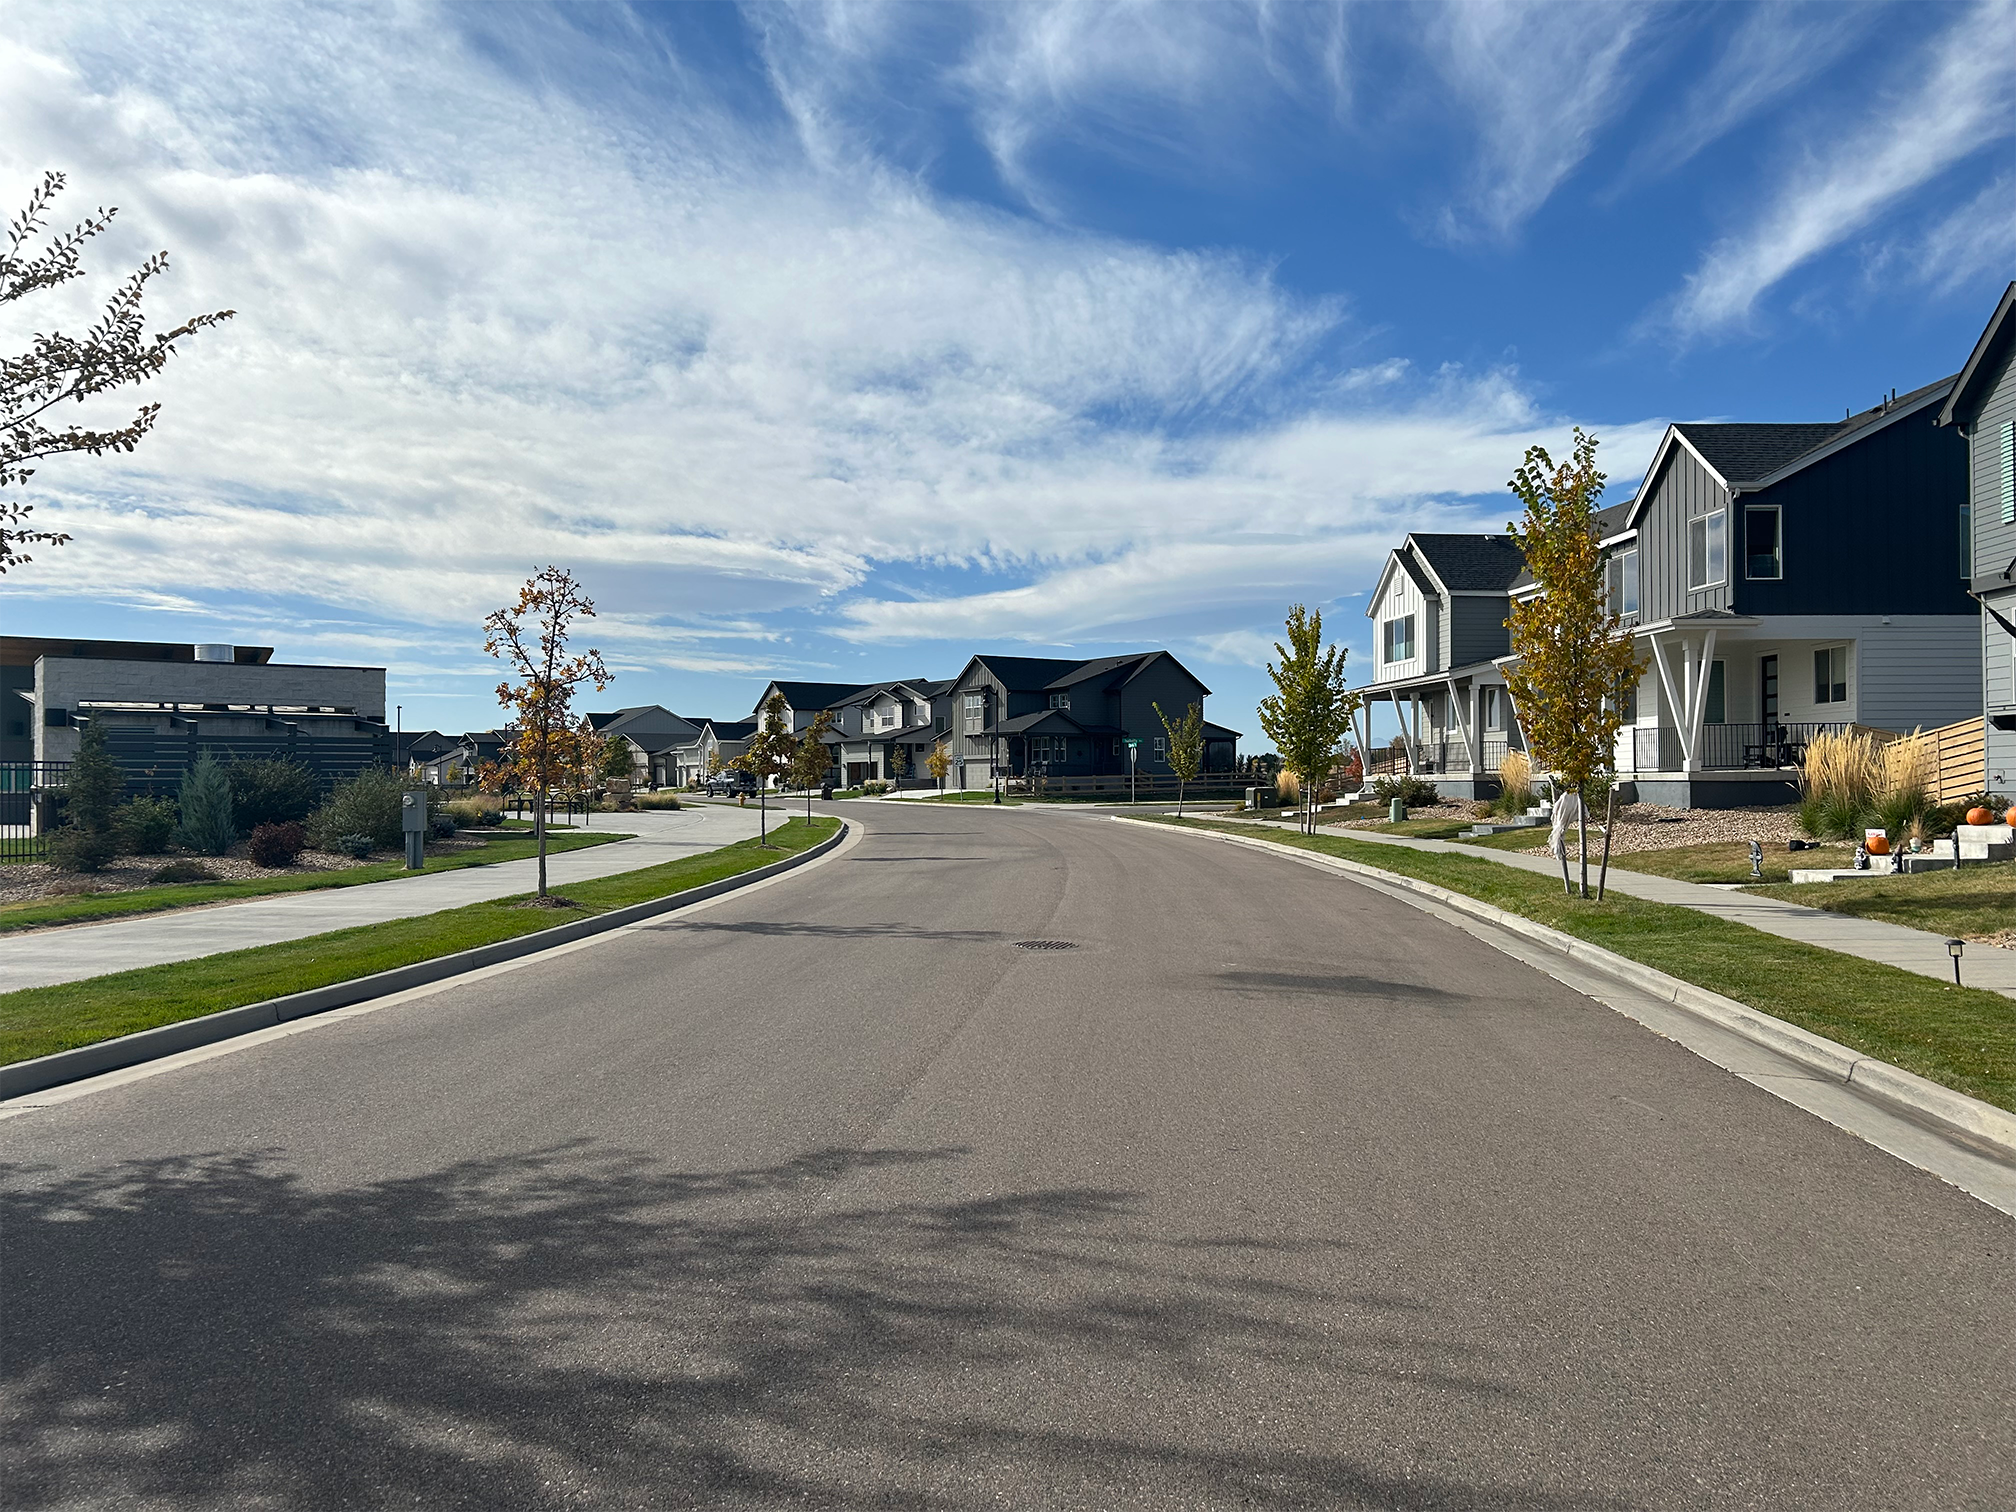
- Property owners are also responsible for keeping trees and other plants in the right-of-way from impeding traffic or blocking visibility. Timnath requires 8 feet of clearance above sidewalks and 14 feet of clearance above streets.

Pruning is a critical part of increasing a tree’s lifespan and is done to accomplish the following objectives:
- Promote tree health and vitality;
- Improve structural integrity and reduce the risk of branch breakage;
- Establish the height of the lowest permanent branch;
- Ensure adequate clearance above sidewalks and streets – to help busses, street sweepers, first responders, trash trucks, and others have safe street access.
Tree Pruning Information
Structural training is a multi-year process that requires annual evaluation and corrective pruning. The training a young tree receives during its growth phase ensures its structural integrity and resilience to storm damage as it matures.
In forests, trees compete for sunlight, leading to a tall trunk and fewer lower branches. In open landscapes, trees have multiple leaders and larger lateral branches. Without structural pruning, trees in man-made landscapes are prone to breakage.
- 5 Keys to Structural Integrity
- Proper Pruning Techniques
- When to Prune
- How Much to Prune
- Pruning Tools
- Pruning Objectives
- A Phased Approach
Keys to Structural Integrity
1. Maintain a Strong Central Leader
Establishing a strong central leader—the tree’s main vertical stem—is crucial for stability and shape.
The leader suppresses lateral growth through the process of apical dominance.
Training a single dominant leader promotes a strong, stable structure and prevents codominant trunks from forming.
2. Maintain Branch to Trunk Ratios
For a strong branch union, a side branch should be less than one-third, and no more than half, the trunk’s diameter.
This ensures an overlap in growth rings, known as the branch collar, which is essential to structural integrity.
When branches and trunks are too similar in size and growth rings do not overlap, weak branch unions form, making trees prone to breakage, especially in storms.

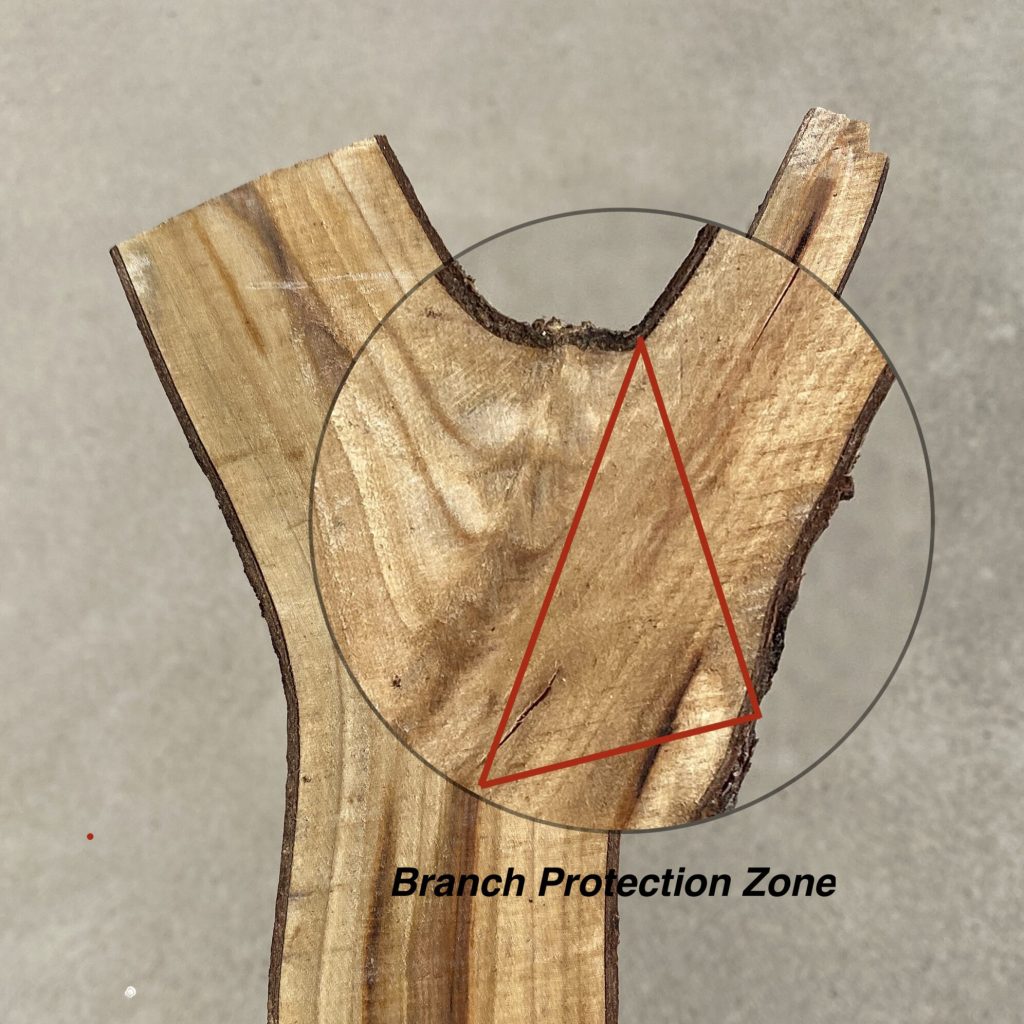
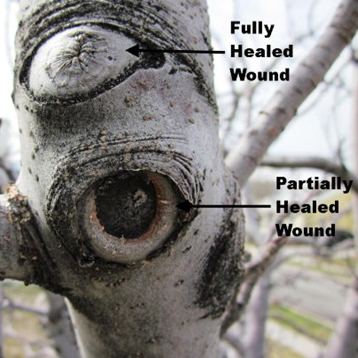
3. Protect the Branch Collar
The branch collar can be identified as a slightly swollen area wrapping around the base of the branch to the branch bark ridge; which is the ridge or a dark line of bark mirroring the angle of attachment of the side branch.

Within the branch collar is a cone of specialized cells referred to as the branch protection zone.
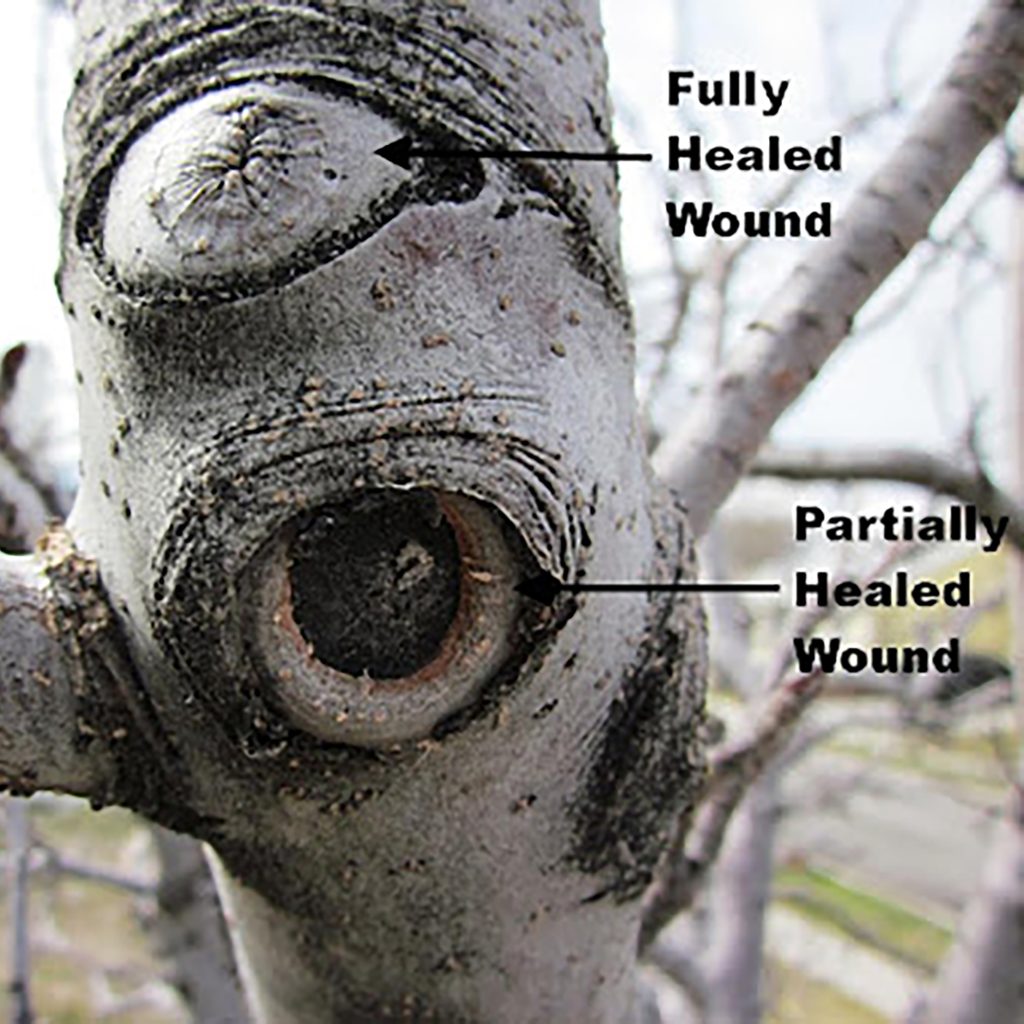
When a branch is pruned or damaged, these cells produce compounds to compartmentalize decay and deter pests while stimulating woundwood growth.

Woundwood forms as a donut-shaped protective growth over cuts, but improper pruning can hinder its development, increasing decay risk.
Preserving the branch collar ensures proper woundwood formation.
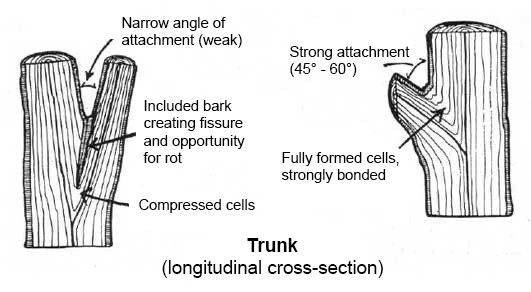
4. Eliminate Narrow Branch Angles
During structural pruning, choose branch unions with wide attachment angles and remove those with narrow unions. Branches with narrow angles of attachment often develop included bark – bark trapped inside the branch union, which weakens the strength of the branch. Encouraging wide branch angles reduces the risk of breakage during storms or heavy snow loads.

5. Minimize Pruning Cuts Over 2 Inches
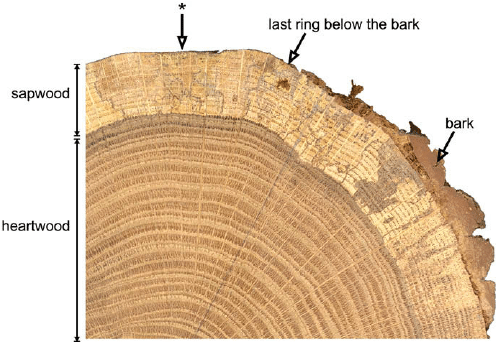
Trees grow in diameter by adding annual rings beneath the bark.
The outer rings, called sapwood, are composed of living cells that transport water and store nutrients, making them resistant to decay. In contrast, the inner rings, known as heartwood, are inactive in water transport and more prone to decay.
Branches up to two inches in diameter are mainly sapwood and can recover from injuries more easily. However, as branches exceed four inches in diameter, heartwood becomes predominant.
Pruning large branches can introduce decay-causing microorganisms into the heartwood, potentially compromising the tree’s structural integrity and health.
Proper Pruning Techniques
Pruning is essential for maintaining tree health by improving structural integrity and reducing the risk of breakage. However, each cut is a controlled wound that exposes the tree to microorganisms, potentially leading to decay and other issues. To mitigate these risks, trees should be pruned only when there is a clear benefit, using the appropriate tools and techniques for each cut.
Before pruning, remember:
- Each cut has the potential to change the tree forever.
- Removal of branches and limbs affects the tree’s ability to gather sunlight for food production.
- Large limb removal can impact form and geometry, affecting stability.
- Inconsiderate removal of branches can leave the tree susceptible to decline.
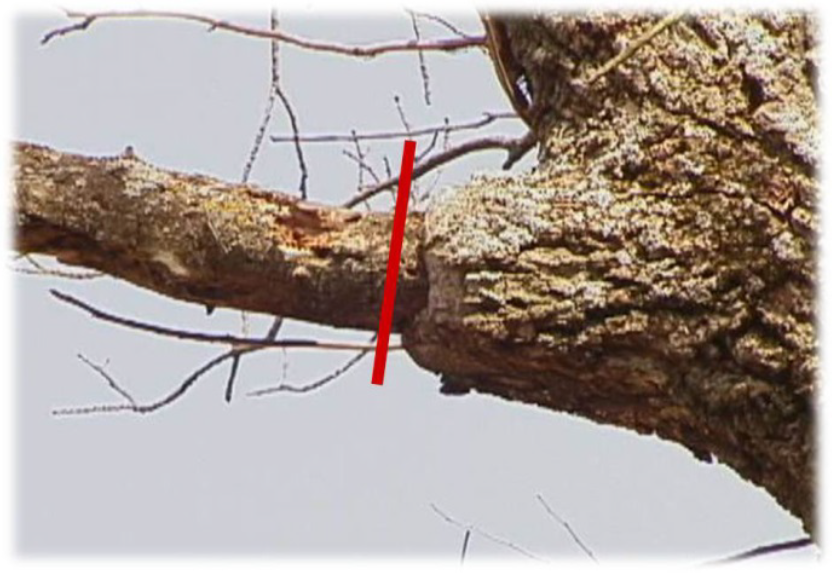
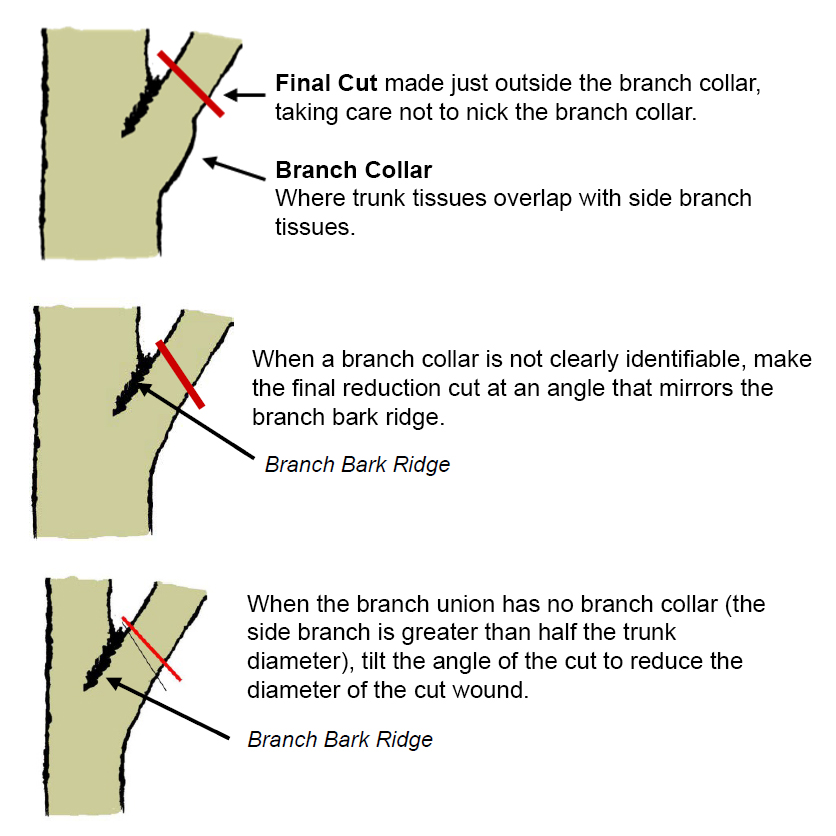
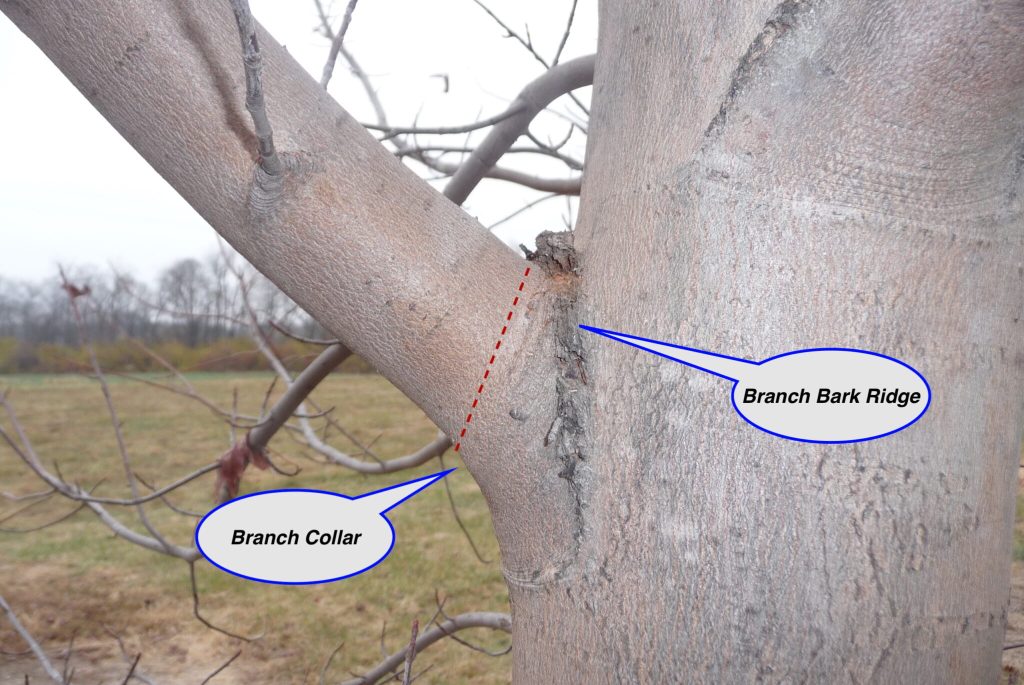
Identify the Branch Collar and Branch Bark Ridge
The branch bark ridge and branch collar are key features that guide the correct placement and angle of pruning cuts.
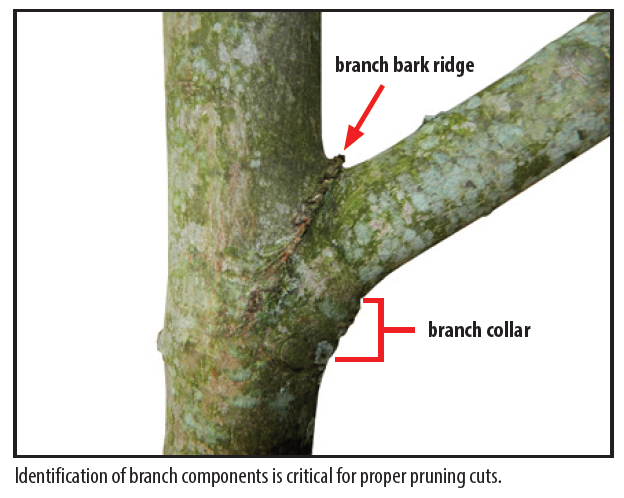
The branch bark ridge, a raised strip where the branch and trunk meet, mirrors the branch’s attachment angle. The branch collar, a swollen area at the base, contains protective cells that aid in healing.
To minimize decay, make pruning cuts just outside the collar without damaging it.
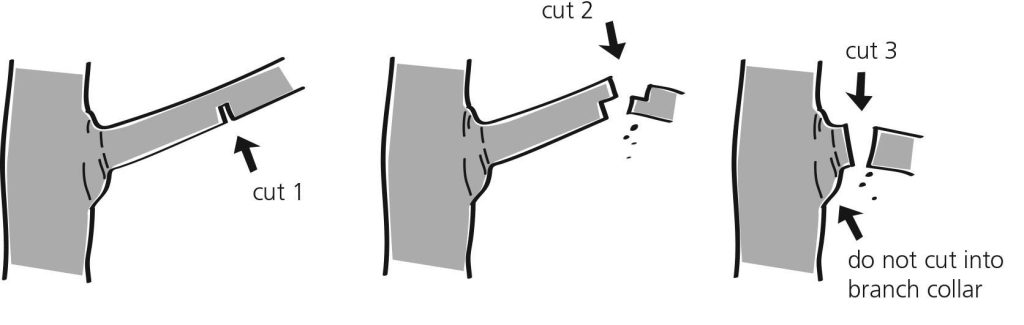
Practice the Three-Cut Method
When removing any branch larger than one inch in diameter, use the three-cut method to protect the bark from tearing.
Cut One: Twelve to fifteen inches from the branch union, make an undercut approximately one-third to halfway through the branch.
Cut Two: Make a downward cut above the undercut. The branch will break as you make the second cut, removing most of its weight. This prevents the weight of the branch from tearing the bark below the collar.
Cut Three: Make the third and final cut at the correct pruning point. For example, on a removal cut, just outside the branch collar.
Removal Cuts
Removal cuts (also known as thinning cuts or collar cuts) remove side branches back to the larger parent branch or trunk. Removal cuts are commonly used for structural pruning of young trees.
With a removal cut, the final cut should be just beyond the branch collar.
In species where the branch collar is not clearly identifiable, make the final cut at the angle that mirrors the angle of the branch bark ridge.
When the side branch is greater than half the diameter of the adjacent trunk, tilt the angle of the final cut out to minimize the size of the wound.

Removing Dead Wood
When removing a dead branch, the final cut should be just outside the branch collar of live bark tissue. If a collar of live wood has begun to grow out along the dead branch, remove only the dead stub, leaving the collar intact. Do not cut into living tissue.
Reduction Cuts
Reduction cuts remove a larger branch or trunk back to a smaller-diameter side branch. To prevent undesired growth at the point of the pruning cut, the diameter of the smaller side branch should be at least one-third the diameter of the larger branch being removed.
Reduction cuts are commonly used in training young trees to slow the growth of competing leaders. Reduction cuts should be avoided on trees that are stressed or in decline.
In a reduction cut, keep in mind that the larger branch being removed will not have developed a branch collar.
Practice the three-step method, and make the reduction cut straight across the base of the branch being removed.
Make the cut at a slight angle if a straight cut would cause water to collect on the cut surface.

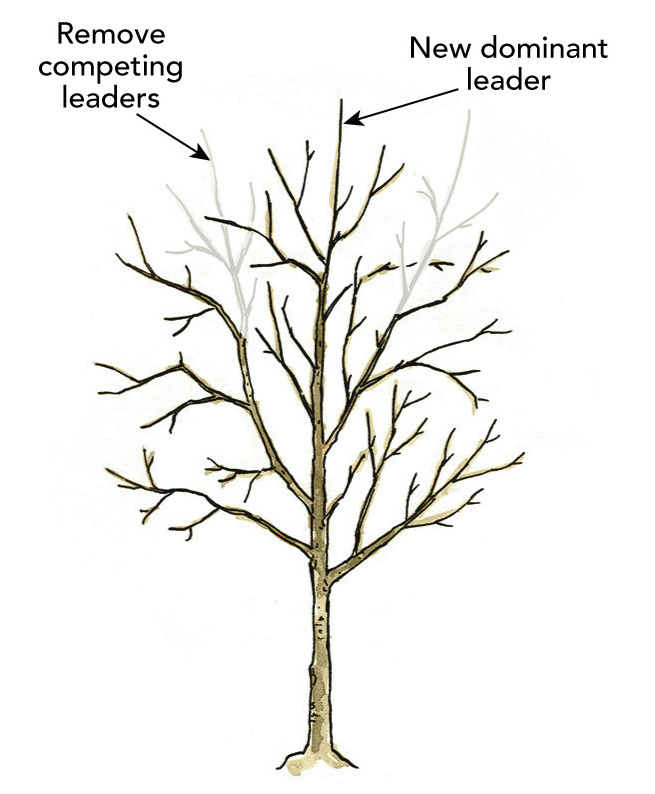
Releadering Cuts

If the central leader on a young tree has died or become damaged, it is possible to use a reduction cut as a releadering cut.
This practice redirects a lateral branch to become a new central leader. It can be helpful to use plant ties and bamboo stakes to guide the new leader’s growth upwards.
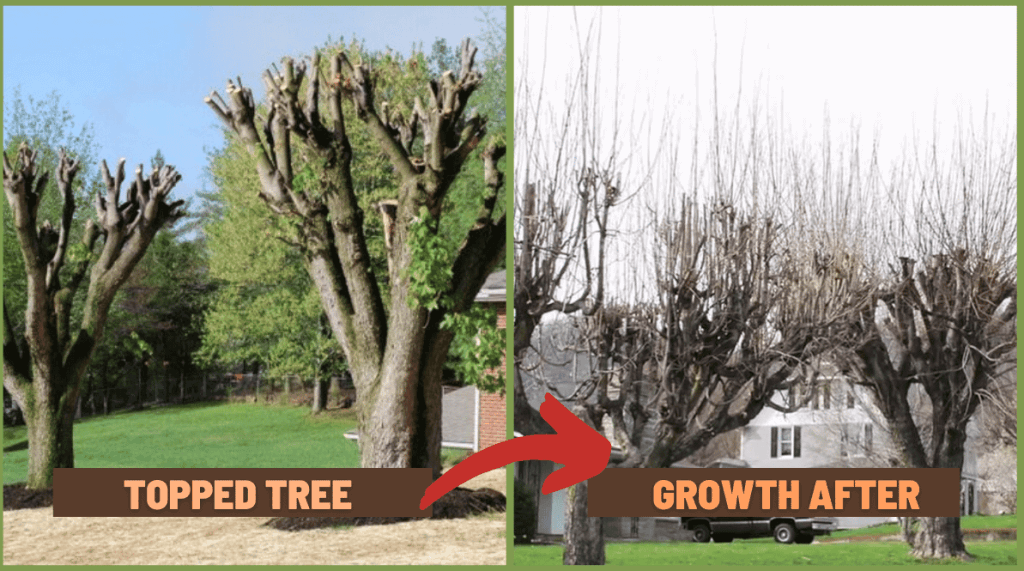
NEVER Top Your Trees
Heading cuts, also known as topping, are unacceptable by tree pruning standards. Heading cuts are common practice when pruning shrubs, as removing the dominant central leader promotes lateral branches to grow. Heading trees produces weakly attached water sprouts and promotes dieback and decay. Never allow your trees to be topped!
AVOID Wound Dressing
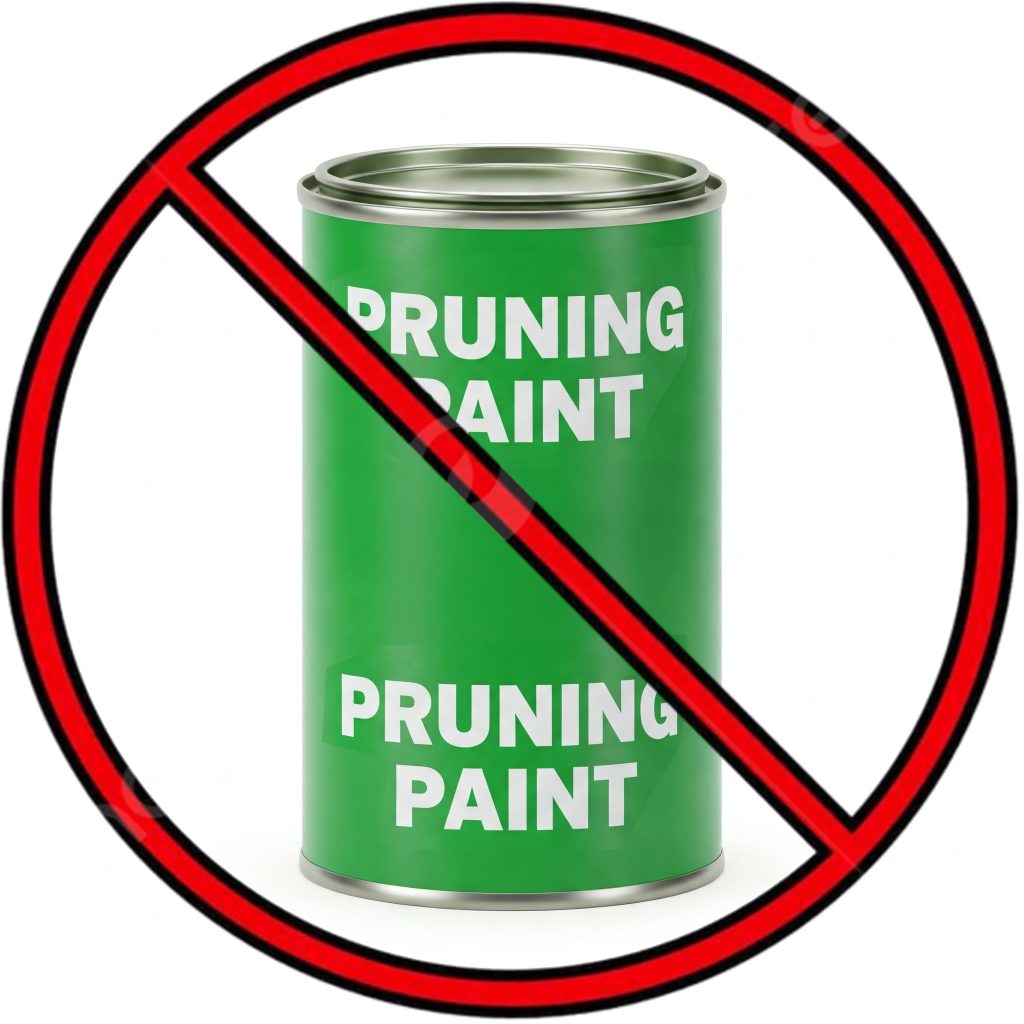
Trees naturally seal pruning wounds, using compounds produced in the branch protection zone to inhibit decay.
While pruning paint was once common practice, research shows it’s unnecessary and can harm trees by damaging tissue or trapping moisture, promoting decay.
When to Prune Trees in Timnath
* Dead, diseased, and damaged wood can be removed any time of year.
Best:
Late Winter (before buds swell)
- On Colorado’s Northern Front Range, late winter—typically in late February or early March—is generally the best time to prune, as trees remain dormant and have not yet begun producing new buds. Pruning during this period minimizes stress on new cuts, reducing the risk of damage from winter’s temperature extremes. While the tree is leafless, it is also easier to evaluate the branching structure to make decisions about where to prune.
- Some tree species are prone to spring sap “bleeding” if they are pruned in the winter. This bleeding is not harmful to the tree but can be a cosmetic issue. For these species, pruning in the summer following the growth flush can alleviate a heavy spring sap flow.
Okay:
Summer (following growth flush)
- Colorado summers are becoming drier, with more frequent drought conditions and water-use restrictions. Pruning a tree that is experiencing drought is never recommended. However, if a tree is healthy and has consistent irrigation, pruning in late spring or early summer—after the leaves have fully expanded and turned green—can be beneficial. Pruning during this time allows the new growth encouraged by pruning to mature over the full growing season.
- For species prone to spring sap “bleeding,” such as elms, Kentucky coffee trees, and maples, pruning in the summer can prevent the cosmetic issue of sap flow from fresh cuts.
Avoid:
Spring (during growth flush)
- Pruning stimulates new growth, which can be problematic during the spring growth flush. The heightened competition between existing branches and newly sprouting lateral branches may result in poor branch spacing and diminished structural integrity.
Late Summer to Fall
- As trees prepare for dormancy, pruning can trigger unseasonal growth, depleting stored carbohydrates. This late flush of tender shoots is vulnerable to cold temperatures and may not survive, disrupting the tree’s natural transition into dormancy.
Late Fall to Midwinter
- The rapid fluctuations between warm and cold temperatures common during Colorado’s winter months can cause cracking in bark and wood, damaging tissues exposed by pruning cuts. During this season, trees are naturally dormant, and their defensive reactions to pruning, including the growth of woundwood, are slowed. To minimize exposure to temperature extremes, it’s best to wait until late winter to prune.
Drought
- Do not remove live wood from trees in drought stress.
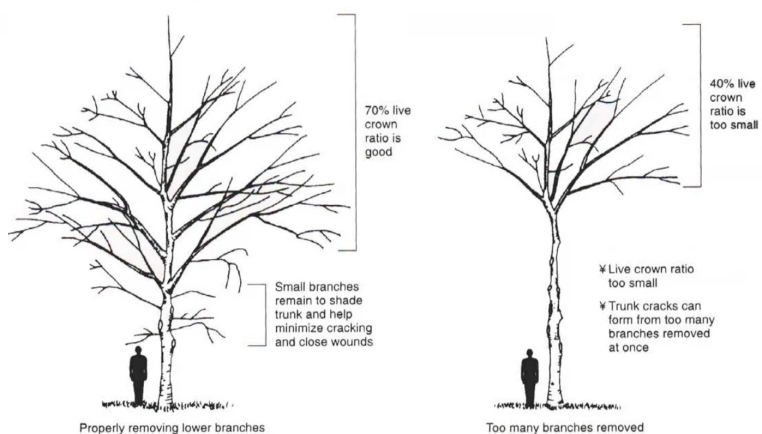
How Much to Prune?
The American National Standards Institute (ANSI) standards state that 25% is generally the maximum amount of a healthy tree’s foliage that can be removed each year.
Up to 30% can be removed from healthy trees in the peak of their growth phase. Mature trees are less tolerant of pruning, no more than 10% of a mature tree’s foliage should be removed annually.
Make sure to maintain a live crown ratio of at least 60%-70%; meaning that at least 60% of the tree’s total height should consist of live branches and foliage, ensuring the tree has enough canopy for healthy growth and photosynthesis.
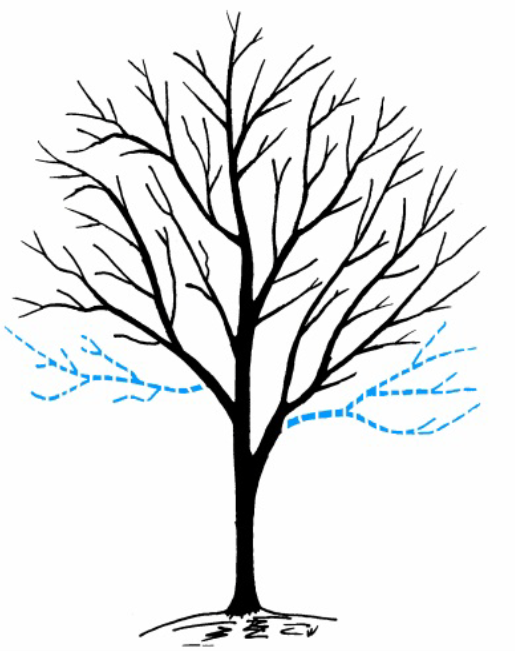
Risks of Over-Pruning
Over-pruning has detrimental impacts on a tree’s health and structure.
When a significant amount of foliage is removed, the tree experiences stress due to the loss of leaves, which are essential for photosynthesis and energy production. This can weaken the tree, making it more susceptible to pests and diseases.
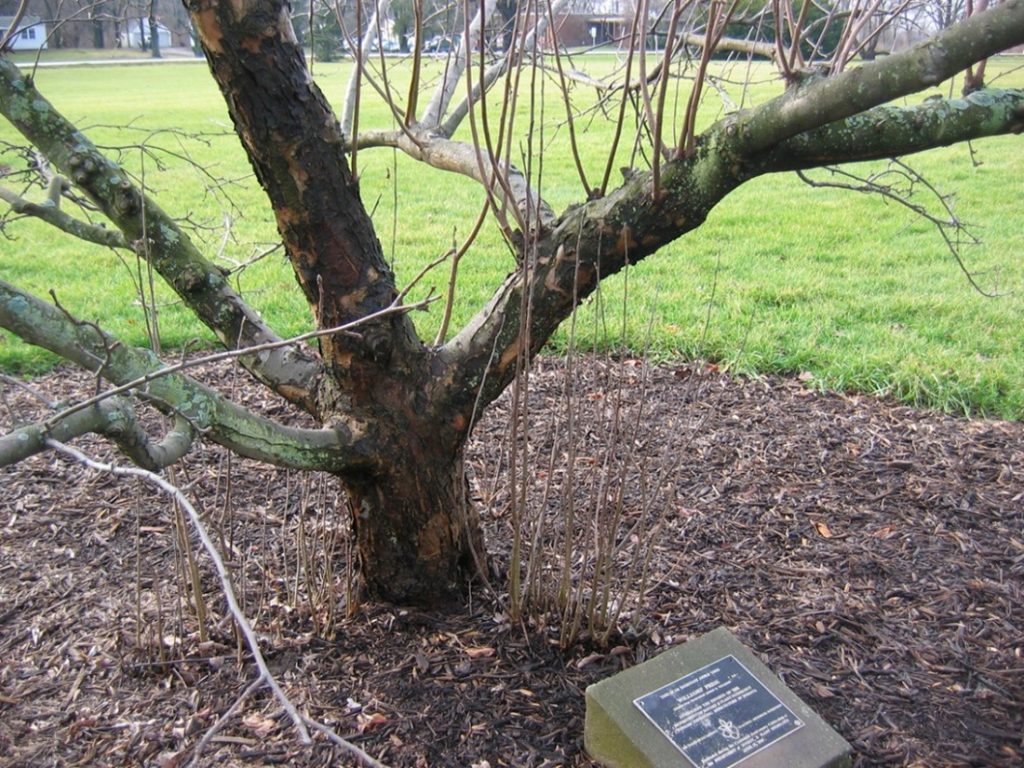
Over-pruning also disrupts the balance of plant hormones produced in the canopy and the roots. Ideally, these hormones should be in equilibrium to ensure that the root system and the above-ground biomass support one another. However, when excessive foliage is removed, the resulting hormonal imbalance can lead to the proliferation of suckers—vigorous shoots that develop from the root system or base of the tree—and water sprouts, which arise from dormant buds on the trunk or branches. Both suckers and water sprouts lack the structural integrity necessary for long-term stability and compete with the main structure of the tree for nutrients and water.
Pruning Tools
The tools needed for pruning depend on the size of the branch to be cut. Keep all tools sharp and disinfect blades with rubbing alcohol to prevent the spread of disease. It is recommended to wear gloves and protective glasses for safety. Check the area to ensure there is enough clearance to work safely.
Small Limbs (less than ½ inch in diameter)
- Hand pruners are used to cut small limbs up to ¼ to ½ inch in diameter. Bypass or scissor-type pruners are recommended, as their two blades bypass each other to create a sharp, clean cut.
- When using bypass pruners, place the blade towards the tree with the hook to the outside to allow for a closer cut.
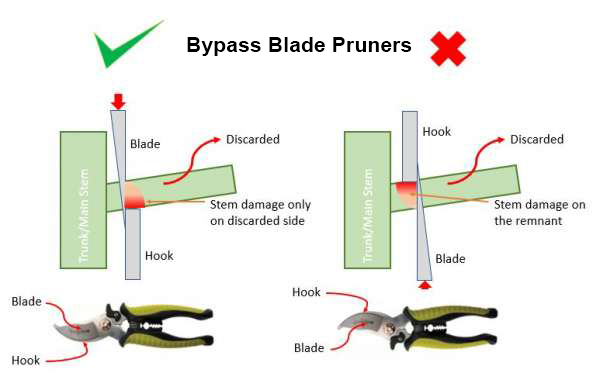
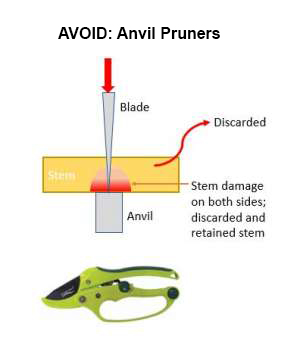
- Avoid anvil-type pruners, which tend to tear and mash, rendering them unsuitable for living plant material. Anvil pruners should be reserved for trimming deadwood only.
Large Limbs (more than ½ inch in diameter)
- Handsaws are used for branches larger than ½ inch. There are two general types of tree saws; tree saws with curved blades cut as the saw is pulled, and are considered safer to use. Tree saws with straight blades cut as the saw is pushed.
- Loppers can be used for larger branches, generally up to two inches in diameter, but should be avoided when possible. They require significant leverage to cut, often resulting in crushed branches and damaged tissues. For a cleaner, healthier cut, consider using a hand saw instead, especially for branches over one inch in diameter. Always use the three-cut method to prevent tearing and unnecessary damage.
- Pole pruners and pole saws can be used for branches beyond reach from the ground, but they can be difficult to control, often resulting in improper cuts that harm the tree. For higher limbs, it is best to hire a certified arborist to ensure safe, precise pruning that promotes tree health.
- Chainsaws are extremely dangerous and should be used with caution. If branches are large enough to require a chainsaw, it’s best to hire a professional arborist to ensure safe and proper pruning.
Pruning Objectives for Young Shade Trees
The goal of structural pruning of young shade trees is to establish a strong structure over time. Remember that no more than 25% of the canopy should be removed in a single year, and achieving a strong structure relies on careful planning and patience. The steps below outline priorities to be tackled over multiple years, not a checklist for one pruning session. For more guidance, see A Phased Approach to Pruning.
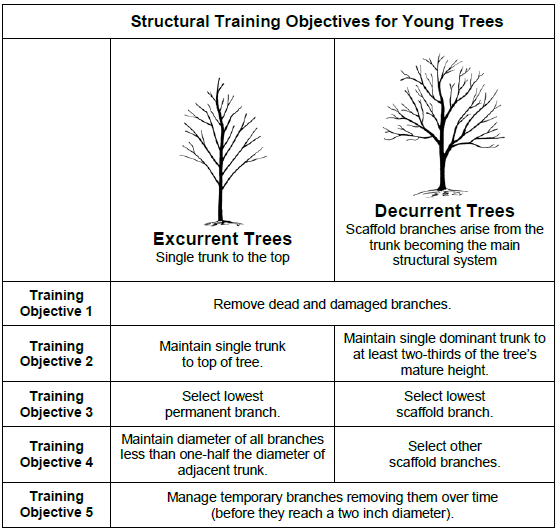
The desired branching structure depends on the natural growth habit of the tree. Deciduous shade trees can be broadly classified into two growth habits: Excurrent and decurrent.
Excurrent trees naturally grow with a central leader to the top of the tree.
- Common deciduous excurrent trees in Timnath include lindens and sugar maples.
Decurrent trees naturally develop multiple large secondary branches or secondary trunks.
- Common decurrent trees include elms, honey locusts, and Kentucky coffee trees.
Pruning Objectives
- Remove dead, damaged, and competing branches
- Dead branches do not contribute to the tree’s photosynthesis and do not need to be considered in calculating the maximum amount of canopy to be pruned. Dead branches can be removed at any time.
- Evaluate crossing and rubbing branches for branch attachment angles, branch collars, and proximity to other primary branches when determining which branch to remove.
- Maintain a single trunk to near the top of the canopy
- In training trees for structural integrity, there is zero tolerance for codominant trunks. Some trees are naturally predisposed to forming a central leader, and other trees tend to grow multiple larger branches.
- On excurrent trees, if a side branch begins growing upright in a trunk-like fashion, prune the branch to redirect growth outwards or remove it entirely.
- With decurrent trees, the objective is to promote the development of a structural system of scaffold branches rather than secondary trunks. By definition, a scaffold branch must be less than one-half the size of the adjacent trunk, and less than one-third is preferred.
- For decurrent trees, maintain a single dominant trunk to at least two-thirds of the tree’s mature height.
- For example, for a tree with a mature height of 45 feet, a single trunk should dominate to a height of at least 30 feet.
- In training trees for structural integrity, there is zero tolerance for codominant trunks. Some trees are naturally predisposed to forming a central leader, and other trees tend to grow multiple larger branches.
- Select the lowest permanent branch/ lowest scaffold branch
- The objective is to identify what will be the lowest permanent branch and manage the removal of temporary branches strategically over time.
- When determining the lowest permanent branch, consider the orientation to sidewalks and streets. Timnath requires 8 feet of clearance over sidewalks, and 14 feet of clearance over streets.
- On excurrent trees, select the lowest permanent branch. Branches below this point become temporary branches.
- On decurrent trees, select the lowest permanent branch, which will become the first scaffold branch. Other scaffold branches will be selected based on the location of this branch. Branches below the lowest (first) scaffold branch become temporary branches.
- Raising removes lower branches for clearance, but young trees shouldn’t be limbed up too early, as they need about half their leafing area in the lower two-thirds to develop trunk taper and withstand wind. Newly planted trees are often too short to have permanent lateral branches.
Alternatives to Removing Large Branches
- If a branch over the sidewalk or street has already grown over 4 inches in diameter, consider making reduction cuts to remove smaller, low-hanging branches along the main branch instead of removing the entire branch.
- This approach minimizes the risk of decay associated with large pruning cuts while still achieving necessary clearance.
- Develop Branching Structure
- Excurrent trees: Branch spacing is not a critical issue, but side branches should be no more than half the trunk’s diameter, ideally one-third, to ensure strong branch collars and avoid weak branch unions.
- Decurrent trees: Choose additional scaffold branches over time, ensuring proper spacing, wide attachment angles, and a good trunk-to-branch ratio. Remove secondary trunks to maintain a dominant central trunk. For spacing, allow at least 6 inches per 10 feet of mature tree height, and eliminate multiple branches at the same trunk location to avoid weak unions.
- Manage Temporary Branches Over Time
- Remove temporary branches over time before they reach 2 inches in diameter.
- Maintaining temporary branches lower on the trunk promotes proper trunk taper and an optimal live crown ratio, supporting healthy growth and structural stability.
A Phased Approach to Pruning
Adapted from Tree Pruning Brochure, City of Portland, Oregon, Parks and Recreation Department.
At the Time of Planting
Keep pruning minimal and limited to dead or broken branches. Newly planted trees need as many branches as possible to establish a robust root system.
A. Prune broken branches.
B. If multiple leaders are present, remove those with a bend or defect to prevent competition with the primary leader.
C. Do not remove small branches growing low on the trunk. These temporary branches help the tree develop resistance to wind and develop a strong trunk taper.
See Planting A New Street Tree for more information on newly planted trees.
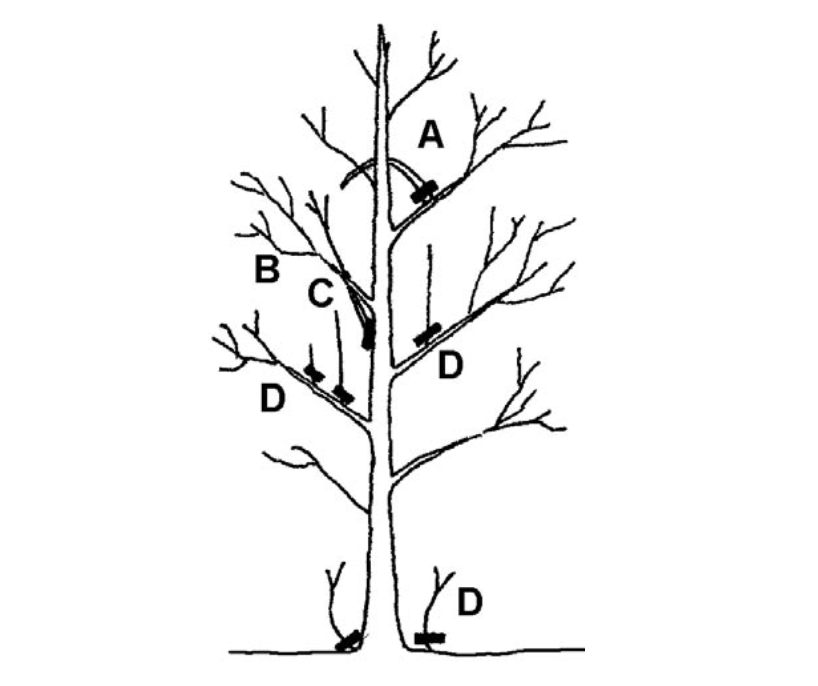
3-4 Years After Planting
By this stage, the tree’s root system should be well-established, supplying nutrients to its rapidly growing branches. New growth may result in problems that can corrected with pruning. Do not remove more than 25% of the tree’s canopy per year.
A. Remove branches heading back into the tree.
B. Remove broken and rubbing branches.
C. Eliminate branches with narrow branch union angles.
D. Remove suckers and water sprouts whenever they emerge.
5 – 7 Years After Planting
At this stage, the tree is establishing the framework for its mature form. Now is the time to ensure its long-term structural stability.
- Select the lowest branch based on sidewalk and street clearance needs.
- Remove branches that will interfere with pedestrians or traffic before they reach 2 inches in diameter.
- Avoid raising the canopy too quickly—lower limbs provide energy for growth.
- Prune temporary branches to reduce their size, keeping them for several years if needed.
- Select branches with proper spacing.
- Focus pruning on branches that are competing, rubbing, or have narrow attachment angles.
Pruning is essential for maintaining tree health by improving structural integrity and reducing the risk of breakage. However, each cut is a controlled wound that exposes the tree to microorganisms, potentially leading to decay and other issues. To mitigate these risks, trees should be pruned only when there is a clear benefit, using the appropriate tools and techniques for each cut.
Before pruning, remember:
- Each cut has the potential to change the tree forever.
- Removal of branches and limbs affects the tree’s ability to gather sunlight for food production.
- Large limb removal can impact form and geometry, affecting stability.
- Inconsiderate removal of branches can leave the tree susceptible to decline.
Identify the Branch Collar and Branch Bark Ridge
The branch bark ridge and branch collar are key features that guide the correct placement and angle of pruning cuts.

The branch bark ridge, a raised strip where the branch and trunk meet, mirrors the branch’s attachment angle. The branch collar, a swollen area at the base, contains protective cells that aid in healing.
To minimize decay, make pruning cuts just outside the collar without damaging it.
Practice the Three-Cut Method
When removing any branch larger than one inch in diameter, use the three-cut method to protect the bark from tearing.
Cut One: Twelve to fifteen inches from the branch union, make an undercut approximately one-third to halfway through the branch.
Cut Two: Make a downward cut above the undercut. The branch will break as you make the second cut, removing most of its weight. This prevents the weight of the branch from tearing the bark below the collar.
Cut Three: Make the third and final cut at the correct pruning point. For example, on a removal cut, just outside the branch collar.
Removal Cuts
Removal cuts (also known as thinning cuts or collar cuts) remove side branches back to the larger parent branch or trunk. Removal cuts are commonly used for structural pruning of young trees.
With a removal cut, the final cut should be just beyond the branch collar.
In species where the branch collar is not clearly identifiable, make the final cut at the angle that mirrors the angle of the branch bark ridge.
When the side branch is greater than half the diameter of the adjacent trunk, tilt the angle of the final cut out to minimize the size of the wound.
Removing Dead Wood
When removing a dead branch, the final cut should be just outside the branch collar of live bark tissue. If a collar of live wood has begun to grow out along the dead branch, remove only the dead stub, leaving the collar intact. Do not cut into living tissue.
Reduction Cuts
Reduction cuts remove a larger branch or trunk back to a smaller-diameter side branch. To prevent undesired growth at the point of the pruning cut, the diameter of the smaller side branch should be at least one-third the diameter of the larger branch being removed.
Reduction cuts are commonly used in training young trees to slow the growth of competing leaders. Reduction cuts should be avoided on trees that are stressed or in decline.
In a reduction cut, keep in mind that the larger branch being removed will not have developed a branch collar.
Practice the three-step method, and make the reduction cut straight across the base of the branch being removed.
Make the cut at a slight angle if a straight cut would cause water to collect on the cut surface.
Releadering Cuts
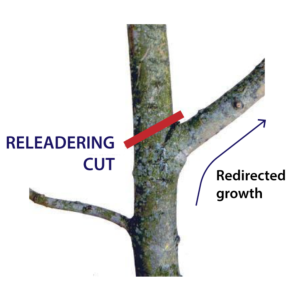
If the central leader on a young tree has died or become damaged, it is possible to use a reduction cut as a releadering cut.
This practice redirects a lateral branch to become a new central leader. It can be helpful to use plant ties and bamboo stakes to guide the new leader’s growth upwards.
NEVER Top Your Trees
Heading cuts, also known as topping, are unacceptable by tree pruning standards. Heading cuts are common practice when pruning shrubs, as removing the dominant central leader promotes lateral branches to grow. Heading trees produces weakly attached water sprouts and promotes dieback and decay. Never allow your trees to be topped!
AVOID Wound Dressing
Trees naturally seal pruning wounds, using compounds produced in the branch protection zone to inhibit decay.
While pruning paint was once common practice, research shows it’s unnecessary and can harm trees by damaging tissue or trapping moisture, promoting decay.
The American National Standards Institute (ANSI) standards state that 25% is generally the maximum amount of a healthy tree’s foliage that can be removed each year. Up to 30% can be removed from healthy trees in the peak of their growth phase. Mature trees are less tolerant of pruning, no more than 10% of a mature tree’s foliage should be removed annually.
Risks of Over-Pruning
Over-pruning has detrimental impacts on a tree’s health and structure.
When a significant amount of foliage is removed, the tree experiences stress due to the loss of leaves, which are essential for photosynthesis and energy production. This can weaken the tree, making it more susceptible to pests and diseases.
Over-pruning also disrupts the balance of plant hormones produced in the canopy and the roots. Ideally, these hormones should be in equilibrium to ensure that the root system and the above-ground biomass support one another. However, when excessive foliage is removed, the resulting hormonal imbalance can lead to the proliferation of suckers—vigorous shoots that develop from the root system or base of the tree—and water sprouts, which arise from dormant buds on the trunk or branches. Both suckers and water sprouts lack the structural integrity necessary for long-term stability and compete with the main structure of the tree for nutrients and water.
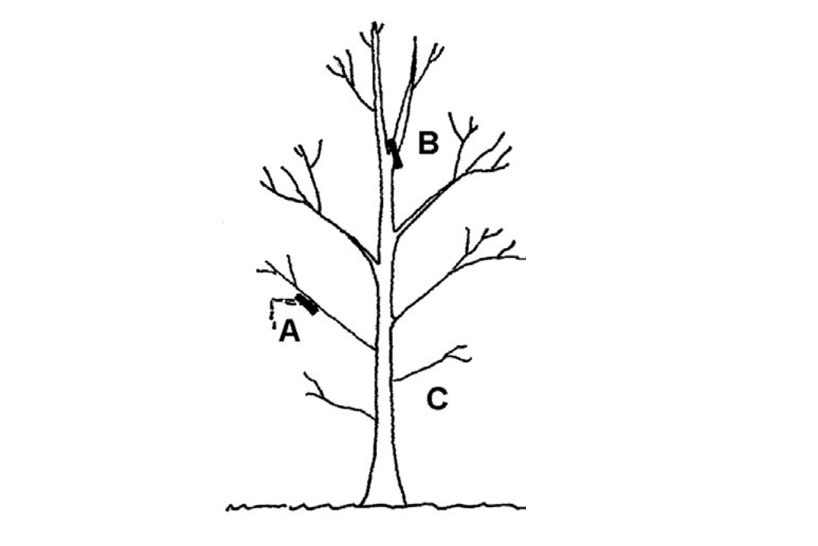
(Caption: a tree with suckers growing at the base and water sprouts growing on the main lateral branches)
The American National Standards Institute (ANSI) standards state that 25% is generally the maximum amount of a healthy tree’s foliage that can be removed each year. Up to 30% can be removed from healthy trees in the peak of their growth phase. Mature trees are less tolerant of pruning, no more than 10% of a mature tree’s foliage should be removed annually.
Risks of Over-Pruning
Over-pruning has detrimental impacts on a tree’s health and structure.
When a significant amount of foliage is removed, the tree experiences stress due to the loss of leaves, which are essential for photosynthesis and energy production. This can weaken the tree, making it more susceptible to pests and diseases.
Over-pruning also disrupts the balance of plant hormones produced in the canopy and the roots. Ideally, these hormones should be in equilibrium to ensure that the root system and the above-ground biomass support one another. However, when excessive foliage is removed, the resulting hormonal imbalance can lead to the proliferation of suckers—vigorous shoots that develop from the root system or base of the tree—and water sprouts, which arise from dormant buds on the trunk or branches. Both suckers and water sprouts lack the structural integrity necessary for long-term stability and compete with the main structure of the tree for nutrients and water.
(Caption: a tree with suckers growing at the base and water sprouts growing on the main lateral branches)
1. A Strong Central Leader
Establishing a strong central leader—the tree’s main vertical stem—is crucial for stability and shape.
The leader suppresses lateral growth through the process of apical dominance.
Training a single dominant leader promotes a strong, stable structure and prevents codominant trunks from forming.
2. Maintain Branch to Trunk Ratios
For a strong branch union, a side branch should be less than one-third, and no more than half, the trunk’s diameter.
This ensures an overlap in growth rings, known as the branch collar, which is essential to structural integrity.
When branches and trunks are too similar in size and growth rings do not overlap, weak branch unions form, making trees prone to breakage, especially in storms.
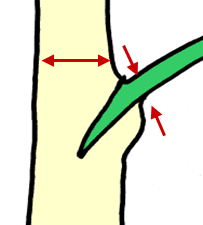
3. Protect the Branch Collar
The branch collar can be identified as a slightly swollen area wrapping around the base of the branch to the branch bark ridge; which is the ridge or a dark line of bark mirroring the angle of attachment of the side branch.
Within the branch collar is a cone of specialized cells referred to as the branch protection zone.
When a branch is pruned or damaged, these cells produce compounds to compartmentalize decay and deter pests while stimulating woundwood growth.
Woundwood forms as a donut-shaped protective growth over cuts, but improper pruning can hinder its development, increasing decay risk.
Preserving the branch collar ensures proper woundwood formation.
4. Eliminate Narrow Branch Angles
During structural pruning, choose branch unions with wide attachment angles and remove those with narrow unions. Branches with narrow angles of attachment often develop included bark – bark trapped inside the branch union, which weakens the strength of the branch. Encouraging wide branch angles reduces the risk of breakage during storms or heavy snow loads.
5. Minimize Pruning Cuts Over 2 Inches
Trees grow in diameter by adding annual rings beneath the bark.
The outer rings, called sapwood, are composed of living cells that transport water and store nutrients, making them resistant to decay. In contrast, the inner rings, known as heartwood, are inactive in water transport and more prone to decay.
Branches up to two inches in diameter are mainly sapwood and can recover from injuries more easily. However, as branches exceed four inches in diameter, heartwood becomes predominant.
Pruning large branches can introduce decay-causing microorganisms into the heartwood, potentially compromising the tree’s structural integrity and health.
Pruning is essential for maintaining tree health by improving structural integrity and reducing the risk of breakage. However, each cut is a controlled wound that exposes the tree to microorganisms, potentially leading to decay and other issues. To mitigate these risks, trees should be pruned only when there is a clear benefit, using the appropriate tools and techniques for each cut.
The American National Standards Institute (ANSI) standards state that 25% is generally the maximum amount of a healthy tree’s foliage that can be removed each year. Up to 30% can be removed from healthy trees in the peak of their growth phase. Mature trees are less tolerant of pruning, no more than 10% of a mature tree’s foliage should be removed annually.
Risks of Over-Pruning
Over-pruning has detrimental impacts on a tree’s health and structure.
When a significant amount of foliage is removed, the tree experiences stress due to the loss of leaves, which are essential for photosynthesis and energy production. This can weaken the tree, making it more susceptible to pests and diseases.
Over-pruning also disrupts the balance of plant hormones produced in the canopy and the roots. Ideally, these hormones should be in equilibrium to ensure that the root system and the above-ground biomass support one another. However, when excessive foliage is removed, the resulting hormonal imbalance can lead to the proliferation of suckers—vigorous shoots that develop from the root system or base of the tree—and water sprouts, which arise from dormant buds on the trunk or branches. Both suckers and water sprouts lack the structural integrity necessary for long-term stability and compete with the main structure of the tree for nutrients and water.
(Caption: a tree with suckers growing at the base and water sprouts growing on the main lateral branches)
1. A Strong Central Leader
Establishing a strong central leader—the tree’s main vertical stem—is crucial for stability and shape.
The leader suppresses lateral growth through the process of apical dominance.
Training a single dominant leader promotes a strong, stable structure and prevents codominant trunks from forming.
2. Maintain Branch to Trunk Ratios
For a strong branch union, a side branch should be less than one-third, and no more than half, the trunk’s diameter.
This ensures an overlap in growth rings, known as the branch collar, which is essential to structural integrity.
When branches and trunks are too similar in size and growth rings do not overlap, weak branch unions form, making trees prone to breakage, especially in storms.
3. Protect the Branch Collar
The branch collar can be identified as a slightly swollen area wrapping around the base of the branch to the branch bark ridge; which is the ridge or a dark line of bark mirroring the angle of attachment of the side branch.
Within the branch collar is a cone of specialized cells referred to as the branch protection zone.
When a branch is pruned or damaged, these cells produce compounds to compartmentalize decay and deter pests while stimulating woundwood growth.
Woundwood forms as a donut-shaped protective growth over cuts, but improper pruning can hinder its development, increasing decay risk.
Preserving the branch collar ensures proper woundwood formation.
4. Eliminate Narrow Branch Angles
During structural pruning, choose branch unions with wide attachment angles and remove those with narrow unions. Branches with narrow angles of attachment often develop included bark – bark trapped inside the branch union, which weakens the strength of the branch. Encouraging wide branch angles reduces the risk of breakage during storms or heavy snow loads.
5. Minimize Pruning Cuts Over 2 Inches
Trees grow in diameter by adding annual rings beneath the bark.
The outer rings, called sapwood, are composed of living cells that transport water and store nutrients, making them resistant to decay. In contrast, the inner rings, known as heartwood, are inactive in water transport and more prone to decay.
Branches up to two inches in diameter are mainly sapwood and can recover from injuries more easily. However, as branches exceed four inches in diameter, heartwood becomes predominant.
Pruning large branches can introduce decay-causing microorganisms into the heartwood, potentially compromising the tree’s structural integrity and health.
Pruning is essential for maintaining tree health by improving structural integrity and reducing the risk of breakage. However, each cut is a controlled wound that exposes the tree to microorganisms, potentially leading to decay and other issues. To mitigate these risks, trees should be pruned only when there is a clear benefit, using the appropriate tools and techniques for each cut.
Before pruning, remember:
- Each cut has the potential to change the tree forever.
- Removal of branches and limbs affects the tree’s ability to gather sunlight for food production.
- Large limb removal can impact form and geometry, affecting stability.
- Inconsiderate removal of branches can leave the tree susceptible to decline.
Identify the Branch Collar and Branch Bark Ridge
The branch bark ridge and branch collar are key features that guide the correct placement and angle of pruning cuts.
The branch bark ridge, a raised strip where the branch and trunk meet, mirrors the branch’s attachment angle. The branch collar, a swollen area at the base, contains protective cells that aid in healing.
To minimize decay, make pruning cuts just outside the collar without damaging it.
Practice the Three-Cut Method
When removing any branch larger than one inch in diameter, use the three-cut method to protect the bark from tearing.
Cut One: Twelve to fifteen inches from the branch union, make an undercut approximately one-third to halfway through the branch.
Cut Two: Make a downward cut above the undercut. The branch will break as you make the second cut, removing most of its weight. This prevents the weight of the branch from tearing the bark below the collar.
Cut Three: Make the third and final cut at the correct pruning point. For example, on a removal cut, just outside the branch collar.
Removal Cuts
Removal cuts (also known as thinning cuts or collar cuts) remove side branches back to the larger parent branch or trunk. Removal cuts are commonly used for structural pruning of young trees.
With a removal cut, the final cut should be just beyond the branch collar.
In species where the branch collar is not clearly identifiable, make the final cut at the angle that mirrors the angle of the branch bark ridge.
When the side branch is greater than half the diameter of the adjacent trunk, tilt the angle of the final cut out to minimize the size of the wound.
Removing Dead Wood
When removing a dead branch, the final cut should be just outside the branch collar of live bark tissue. If a collar of live wood has begun to grow out along the dead branch, remove only the dead stub, leaving the collar intact. Do not cut into living tissue.
Reduction Cuts
Reduction cuts remove a larger branch or trunk back to a smaller-diameter side branch. To prevent undesired growth at the point of the pruning cut, the diameter of the smaller side branch should be at least one-third the diameter of the larger branch being removed.
Reduction cuts are commonly used in training young trees to slow the growth of competing leaders. Reduction cuts should be avoided on trees that are stressed or in decline.
In a reduction cut, keep in mind that the larger branch being removed will not have developed a branch collar.
Practice the three-step method, and make the reduction cut straight across the base of the branch being removed.
Make the cut at a slight angle if a straight cut would cause water to collect on the cut surface.
Releadering Cuts
If the central leader on a young tree has died or become damaged, it is possible to use a reduction cut as a releadering cut.
This practice redirects a lateral branch to become a new central leader. It can be helpful to use plant ties and bamboo stakes to guide the new leader’s growth upwards.
NEVER Top Your Trees
Heading cuts, also known as topping, are unacceptable by tree pruning standards. Heading cuts are common practice when pruning shrubs, as removing the dominant central leader promotes lateral branches to grow. Heading trees produces weakly attached water sprouts and promotes dieback and decay. Never allow your trees to be topped!
AVOID Wound Dressing
Trees naturally seal pruning wounds, using compounds produced in the branch protection zone to inhibit decay.
While pruning paint was once common practice, research shows it’s unnecessary and can harm trees by damaging tissue or trapping moisture, promoting decay.
The American National Standards Institute (ANSI) standards state that 25% is generally the maximum amount of a healthy tree’s foliage that can be removed each year. Up to 30% can be removed from healthy trees in the peak of their growth phase. Mature trees are less tolerant of pruning, no more than 10% of a mature tree’s foliage should be removed annually.
Risks of Over-Pruning
Over-pruning has detrimental impacts on a tree’s health and structure.
When a significant amount of foliage is removed, the tree experiences stress due to the loss of leaves, which are essential for photosynthesis and energy production. This can weaken the tree, making it more susceptible to pests and diseases.
Over-pruning also disrupts the balance of plant hormones produced in the canopy and the roots. Ideally, these hormones should be in equilibrium to ensure that the root system and the above-ground biomass support one another. However, when excessive foliage is removed, the resulting hormonal imbalance can lead to the proliferation of suckers—vigorous shoots that develop from the root system or base of the tree—and water sprouts, which arise from dormant buds on the trunk or branches. Both suckers and water sprouts lack the structural integrity necessary for long-term stability and compete with the main structure of the tree for nutrients and water.
(Caption: a tree with suckers growing at the base and water sprouts growing on the main lateral branches)
Planting a New Tree
Planting a tree is a wonderful way to enhance our community, but the successful establishment of a newly planted tree depends on several factors. To help your new tree thrive, explore the resources below for recommended species, proper planting techniques, and seasonal care tips.
What to Plant
Timnath has compiled a list of approved species for street trees. These species have displayed no serious vitality issues in the Northern Colorado climate. Other species may be suggested, but these require Director approval.
The Front Range Tree Recommendation List is an excellent resource, created through a collaboration with Colorado State University Extension, the Colorado State Forest Service, and other partners.
Please note that your HOA or metro district may also have specific restrictions or guidance on approved tree species.
When shopping for a tree, consider it’s:
- Growth rate
- Mature size
- Form
- Hardiness to survive low temperatures
- Heat tolerance and drought tolerance
- Pest resistance
- Maintenance issues
- Native versus nonnative species
At the store or nursery, look for a tree that appears healthy and free of pests and diseases, with a single dominant leader, and foliage and branches distributed through two-thirds of the tree.
When to Plant a Tree in Timnath
Optimal periods for planting trees in Colorado are during spring (March 15 to June 15) and fall (September 1 to October 15), when outdoor temperatures are not so extreme.
Make sure newly planted trees are sufficiently irrigated, keeping the soil moist but not saturated. While fall planting can be ideal, take care to ensure that trees do not dry out over the winters.
Cold Weather Considerations
Winter Watering
Winter watering on warm winter days is essential to the establishment and health of newly planted trees. Established trees also benefit from winter watering in periods without significant snowfall.
Aim to water at least twice a month on days without snow coverage, when the air and soil temperatures are over 40° F.
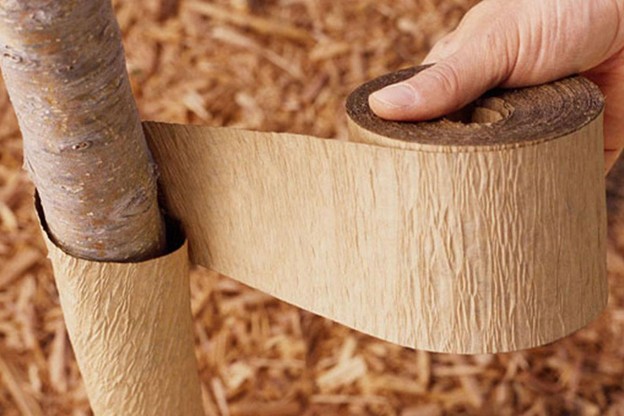
Tree Wrap
Young trees thin bark, making them susceptible to sunscald and frost cracking with Colorado’s frequent winter temperature swings. For several years after planting, young trees benefit from seasonal wrapping.
Tree wrap should be applied each year in late October or early November and removed in late April or early May. Overlap the wrap by one-third on each pass around the trunk.
Species like Maples, Lindens, Crabapples, and Honeylocust are particularly vulnerable, and wrapping can help protect them until their bark thickens over time.
How to Plant a Tree
Before you start digging, remember to contact 811 to have underground utilities marked—it’s free, it’s the law, and it helps prevent damage to essential services.

- Dig a Hole
- Dig a saucer-shaped hole 3 times the diameter of the root ball and no deeper than the root ball. Use a shovel to measure the depth of your planting hole. When planted, the top of the root ball should be slightly above ground level. The root flare must be visible 1 inch above final grade after planting; trees planted too deep are subject to a variety of issues.
- Remove the Container
- For balled-and-burlap trees, first remove the bottom portion of the wire basket. Slowly place the tree in the premeasured hole, being careful not to fracture the root ball. Remove the rest of the wire basket. Remove any remaining wire and twine, then peel back and remove the burlap. For container grown trees, completely remove the container.
- It is essential to remove the entire wire basket or container, as these materials damage root development and grow into the tissues of the tree as it matures.
- For balled-and-burlap trees, first remove the bottom portion of the wire basket. Slowly place the tree in the premeasured hole, being careful not to fracture the root ball. Remove the rest of the wire basket. Remove any remaining wire and twine, then peel back and remove the burlap. For container grown trees, completely remove the container.
- Place the Tree on Solid Ground in the Hole
- Set the root ball on solid ground in the hole, not on loose backfill. After the root ball is in the hole, check to confirm that the root flare (the flare where the trunk meets the root) is visible. You may have to pull back some of the dirt from the root ball. Backfill the hole with the original soil and gently pack the backfilled soil around the root ball. Adding fertilizer or compost can encourage leaf growth over root development, and for newly planted trees, establishing a strong root system is the priority. In Colorado, it’s best to avoid fertilizing trees at the time of planting.
- Spread Mulch
- Spread mulch 3-4 inches deep and at least as wide as the planting hole, but do not place mulch within 3-6 inches from the trunk of the tree. Mulch protects roots, holds moisture in the soil, reduces the growth of weeds, and provides a protective margin to prevent damage from lawnmowers and weed-eaters. Keep mulched areas free from grass and weeds, as they compete for the same water and nutrient resources as the new tree.
- Staking and Wrapping
- If necessary, stake the tree to keep the root ball from shifting in strong winds. The primary leader of the tree must be able to sway in the wind. If it is too rigid, root and stem growth will be adversely affected, and the trunk will not develop a strong taper to provide resilience to wind.
- Use wide straps to tie trees to stakes. Do not use wire, string, rope or rubber hose, as these can girdle or “strangle” a growing tree.Remove stakes and straps after roots are established, usually after one or two growing seasons.
- If planting in the fall, tree wrap should be applied up the trunk and should remain in place from late October to early May to prevent sun scald and cracking. Overlap the wrap by one-third on each pass around the trunk.
- If necessary, stake the tree to keep the root ball from shifting in strong winds. The primary leader of the tree must be able to sway in the wind. If it is too rigid, root and stem growth will be adversely affected, and the trunk will not develop a strong taper to provide resilience to wind.
- Watering
- After planting, keep the soil moist but not saturated. Irrigation is necessary, especially during the heat of summer (water in the early morning or at dusk) and in dry winters (take care not to freeze your pipes).
- Generally, a newly planted tree should be watered every three to five days during the growing season, depending on weather and soil conditions. Remember that trees also need water during dry periods in the winter months. Consistent moisture is essential. Maintaining consistent soil moisture allows for better water absorption and promotes root growth throughout the root ball. Drought stressed or over-watered trees are more vulnerable to dieback, disease, and insect infestations.
- A general guideline for how much to water newly planted trees is 10 gallons of per inch of tree diameter; for example, a one-inch tree will require 10 gallons of water each time it is watered. For mature trees 10 inches in diameter or more, apply 15 gallons of water per inch of tree diameter.
- Water deeply and slowly to moisten the critical root zone (trunk to dripline) to a depth of 12 inches. Apply water at multiple points under the dripline for even distribution. Use a soaker hose, spray wand, deep root fork or needle. Since most water-absorbing roots are in the top 6–12 inches, placing watering devices too deep can be counterproductive.
- After planting, keep the soil moist but not saturated. Irrigation is necessary, especially during the heat of summer (water in the early morning or at dusk) and in dry winters (take care not to freeze your pipes).
Hiring an Arborist
Hire a reputable arborist who is licensed, bonded, and insured. Industry groups, such as the International Society of Arboriculture, administer arborist certification programs that train arborists and require them to adhere to a code of ethics. Accreditation is based on experience and demonstrated knowledge, and arborists must maintain accreditation by completing continuing education units.
Gather estimates from multiple certified arborists. Two or more estimates are worth the extra effort, and many reputable companies provide estimates free-of-charge.
A good arborist:
- Will offer a wide range of services such as pruning, fertilizing, cabling/bracing, and pest control.
- Will not recommend topping a tree, except under very rare circumstances.
- Will not use climbing spikes unless the tree is being removed.
Glossary of Terms
Apical Dominance – The phenomenon where the main, central leader (apical bud) of a tree or branch suppresses the growth of lateral buds, directing energy toward upward growth rather than outward branching.
Branch Bark Ridge – The raised line where trunk and branch bark meet, mirroring the branch’s angle of attachment.
Branch Collar – A swollen area at the base of a branch where it attaches to the trunk or a larger limb.
Branch Protection Zone – The combined area of the branch collar, branch bark ridge, and branch-stem overlap that contains tissues that help seal pruning wounds and compartmentalize decay.
Branch Union – The point of attachment where a branch connects to the trunk or another branch.
Central Leader – The main vertical stem of a plant or tree.
Codominant Trunks – Two or more main stems of a tree that grow from the same point and are similar in diameter. The stems compete for dominance, and as the tree grows, they remain similar in size.
Decurrent – A growth habit where trees naturally develop multiple large secondary branches or secondary trunks. Common decurrent trees include elms, honey locust, and Kentucky coffee trees.
Excurrent – A growth habit where trees naturally grow with a central leader to the top of the tree. Common deciduous excurrent trees in Timnath include lindens and sugar maples.
Raising – Pruning lower branches to create clearance for pedestrians, vehicles, buildings, or scenic views.
Scaffold Branches – The main structural limbs of a decurrent tree, which should be spaced with even distribution around the trunk to create a strong, balanced canopy.
Structural Pruning – The selective removal of branches over time to establish a strong, stable tree structure by promoting a dominant central leader and well-spaced, properly attached limbs.
Suckers – Suckers are fast-growing shoots that sprout from a tree’s roots or lower trunk, usually in response to stress, damage, or heavy pruning.
Water sprouts – Fast-growing, upright shoots that emerge from the trunk or branches of a tree, usually in response to stress, over-pruning, or damage.
Woundwood – Specialized tissue that forms over a branch injury or pruning wound, often creating a donut-shaped barrier that seals the wound and helps prevent decay.
Commitment to Care
Caring for our street trees is a long-term commitment that results in a healthy, robust urban canopy, enhancing the beauty of our community. By following these guidelines for proper pruning and care, you can help ensure that your trees thrive, boosting both visual appeal and ecological benefits throughout our town.
Sources:
The content on this page was adapted for the Town of Timnath from the following source material:
Colorado State University Extension. Science of Pruning (Full Section). Available at: https://extension.colostate.edu/Gardennotes/Science-of-Pruning-Full-Section.pdf
Colorado State Forest Service. Selecting, Planting, and Caring for Trees in Colorado. Available at: https://csfs.colostate.edu/colorado-trees/selecting-planting-and-caring-for-trees/
Purdue Extension. Tree Pruning Essentials. Purdue University, FNR-506-W. Available at: https://extension.purdue.edu/extmedia/fnr/fnr-506-w.pdf
FAQs
- How do I know if a tree is mine to maintain?
- If you maintain the lawn or sprinklers around the tree, it’s likely your responsibility to care for the tree itself.
- Why do I need to prune my street tree?
- Pruning street trees promotes health, structural integrity, and safety by reducing branch breakage and maintaining clearances for sidewalks and streets.
- When should I prune my trees?
- On Colorado’s Northern Front Range, including Timnath, late winter (usually late February or early March) is generally the best time to prune, as trees are dormant. See When to Prune Trees in Timnath for more details.
- What happens if I don’t prune my tree?
- Neglecting to prune obstructing limbs may lead to fines and safety hazards. If you are unable to prune your own tree, hire a professional arborist. See Hiring an Arborist for details.
- If my tree dies, what should I replant?
- You can find Timnath’s list of approved street trees on our website. Be sure to check with your HOA or Metro District for additional requirements, and review the section on How to Plant a Tree for proper techniques.
- Does the town offer tree limb removal?
- During spring cleanup day, Timnath residents can bring tree limbs and other landscape debris to Timnath Community Park for disposal. techniques.
Resources for Homeowners
If you have questions about tree care, we recommend the following resources:
- Colorado State University Extension
- Purdue University Extension
- ISA Rocky Mountain Chapter – Find an Arborist
Contact the Town
To report any concerns about street trees in your area, please contact the Town of Timnath’s Community Development and Planning Department at [email protected].